Adding patch parsing to a preset. Step by step

Hi , this thread will be used to inform members of the E1 community about the steps to add patch parsing to a preset.

The preset in mind is the one for Novation A-station. A digital virtual analog synth, already considered vintage by some. It’s not expensive on the second hand market (bought mine on Ebay last year under 250 EUR), and it is a descendant from Novation’s legendary Supernova range. Novation stuff is not unknown to me (A-station, Circuit Mono Station, Summit, Bass station VST, V-station VST, SL Mk III) but this is my favourite one of the range, as it combines an ease of use with a fabulous fat sound.

Anyway, when it comes to patch parsing, you must realize this isn’t possible with all synths. So when I buy an instrument, I do this for two reasons: or for the sound (for instance a System-8 or a Yamaha TG-77), or because it is a sound method or synth range I haven’t worked with before.
In the latter case, the choices are constrained on purpose to synths for which I expect to open them up via patch parsing. Because there is no point in acquiring an unknown methodology if you aren’t able to figure out how it is being used, is it?
That brings us to the advantage of VST’s anyways, where it is almost always possible to see how the sound has been constructed. But my heart lays with hardware synths, and especially the hard nuts to crack (ever tried to program a Matrix 1000 ?).

The A-station belongs to the range of Supernova’s, it was cheap to acquire, doesn’t take too much space (1U rack) and very important: the SysEx information seems well documented. Especially the latter is the biggest motivator to write an E1 preset for this machine.

Anyway, we’ve started off with making a regular preset for the Novation A-Station. this has been finished already. It’s of medium complexity, containing controls that had to be recombined to form one singme MIDI CC, and I added some formats, and color substitutions as well.
This present is copied into a clone called “A-station No Parsing” as a form of tutorial.
Electra One App.
A good basis to start this roadmap into patch parsing! That means: I won’t be developing anything around patch parsing in this clone

Anyone can then compare later on this ‘no-parsing’ version against another preset, currently called " A-station NIG V2c"
https://app.electra.one/preset/ho3zZmtuQYqfTnTa7ZH2
This version will be further developed into one that will contain (hopefully) all the patch parsing there is to it.

If there are specifics about this process you want to see adressed, do let me know.

Ignace

5 Likes

Step 1 : find and configure the SysEx sound dump request

How this request looks is difficult to reverse engineer, you must find information about it. In the case of the Novation A-station it’s documented in the manual on page A-12, but sometimes this is only found in some addendum or on someone’s website. As explained I first search for this info before buying synths, so I know what I’m dealing with.
image

The SysEx messages that are relevant for patch parsing are the request messages for getting a dump of the current sound from the synths edit buffer, and of course the dumps themselves. Usually there is only one of each, but that may differ from synth to synth.
In this case all bytes are fixed (or we don’t care), except for the SysEx Channel. As I don’t know exactly how that SysEx Channel byte will behave, we’ll make a function for it, so we can assign it any value we want in the preset’s lua code.

In the top of my lua code I usually start with reading the main characteristics of the device I’m using. This device is normally device 1 in my presets, but other users of the presets may assign that device a different channel for instance, so I make sure that way the lua code follows the channel information set by the user:

deviceId = 1
device = devices.get(deviceId)
devPort = device:getPort()
channel = device:getChannel()

function sysExChannel ()
    return channel
end

Let’s test.
As this is the only request in the preset so far, you will be able to trigger it with the upper right button of the E1. Let’s monitor with midi-Ox and sure enough, the request is being sent as desired (which is: the sysExChannel has been converted to value 11 (0B in hex) which is the MIDI channel of my preset):
image

Next thing is to check if the A-station responds to the request, so we know we have bi-directional communication. Currently that is not the case yet: neither Midi-Ox is showing a reply, neither is the ‘MIDI 1 IN’ on the E1 highlighting. However when I tweak a control on the A-station, I do get to see CC messages being received on the E1 (in the section below the lua editor,) as well as in midi-Ox, so the routing is okay:

Perhaps there is a setting to make the A-station respond to SysEx? We must check on keywords such as ‘utility’, ‘configuration’, ‘globals’, ‘global menu’ or ‘global settings’ or ‘SysEx’ in the manual.
I did not find such a setting, but found a way to force the A-station to send out a SysEx current sound dump (key 7 in utitlity mode). Sure enough, the SysEx dump is being forwarded:
image
Here midi-Ox comes in handy: the E1 won’t show any signs of reception yet, as we haven’t configured the E1 yet to parse this response. But midi-Ox at least proofs the A-station sends it out.

So why isn’t the synth responding to the request the E1 provided? Well, let’s check the request message syntax again. I wasn’t too sure about that sysExchannel byte, remember? So I assumed it should equal the MIDI channel of the synth but that doesn’t work. But in the SysEx dump from the A-station you can clearly see the A-station uses 7F (or 127) as sysExchannel:
image

So I’ve changed my function to match that 127 as well, and commented what I found

function sysExChannel ()
    return 127  -- assigning the regular MIDI synth channel did not provide SysEx responses. 7F or 127 does.
end

And sure enough, this time the request from the E1 is met by a response from the A-station, visualized on midi-Ox :slight_smile:
image

5 Likes

Step 2. Make the E1 aware of the SysEx response

In this case, the manual details how the response’s header and payload looks like. We’re not always that lucky. But even if documentation is available, bear in my there are almost always errors in it. So while using it, be sure to check if it corresponds to the reality.

In this step, we make sure the E1 is considering the SysEx response for parsing.
The manual states the response looks as follows:
image

Let’s compare this with the response we see in midi-Ox:

image

Good :smiley:We can safely state the header of the message in midi-Ox corresponds to the one in the manual.

However this header, 12 bytes long (we disregard the SysEx Start byte as part of the header), has only the first 8 bytes that should be the same for any A-station (hopefully): bytes 9 and 10 transmit Software Version and Version Increment, both of which we are unsure they are the same for all A-stations out there.
For this reason I will not use all 12 bytes to identify the response, but only the first 8 bytes. I’m practically sure that byte 7 (the Message Type) will ensure this response is perfectly identifiable in all cases as the Current Sound Dump from the A-station.

So let’s define this response header in the preset now.
I could of course again define each byte here one after the other in the Messages tab:

But instead let’s go the the json tab, copy the Request part, paste it into the Response Header and amend it to fit just those expected first 8 bytes of the response:


will now become:

  • Notice I’ve left out the sysExChannel in the response, but instead replaced it with “7F”. The parsing seems to work better if no functions are added to the response header. And anyways manuals states the response is always 7Fh.

In the messages tab, we can change the response name: allthough that is not strictly necessary, it just reads better.

Now go into the Mapping tab of the Editor, and enable MIDI-learn using the Mic-symbol

Then press the upper right button on the E1 (which sends out the Dump Request SysEx.

‘Lo and Behold’, the magic happens :tada:, and we get to set the response SysEx laid out for us in the Editor:

Check the following:

  • the response’s total length is 142 bytes, which equals the length mentioned in midi-Ox. That’s good
  • the E1 editor adds an byte number, starting at 0, at the left of each byte after the header. But because I chose a header that is 4 bytes shorter than the actually one, be aware to correct the byte count accordingly: as the manual states that the payload of the message (called the ‘PROGRAM BLOCK’) is 128 bytes long, I will end up with 4 bytes more. You can do the math yourself with the screenshot below, that shows the end of the message, that this too is correct.
  • be aware the responses shown contain both the F0h (SysEx start) and F7h (End of Exclusive) bytes
    image
6 Likes

Before I read your in-depth post could you just tell us what is “patch parsing” please ?

1 Like

Simple answer is – making sense of the hex/binary data spewed by your gear.

A bit more – to talk to your gear something needs to understand the protocol and the data being sent. So to parse a patch means to look at the data coming across, figure out how it’s put together, figure out how to take it apart and assign it to variables/parameters.

Once you can parse (understand) the data, you can change it, display it, and send it back and that how a lot of these presets are made.

Sometimes modern gear has a “Learn” mode where you can have a controller lik ethe Electra One communicate with the device and they can exchange information to make it easier to map a control to a parameter.

1 Like

Step 3. Parsing the individual parameters. The goal

Now we come to the actual goal of the whole exercise: Once we will have parsed all individual parameters available in the sysEx sound dump response, we will be able to assign those values to the parameters / controls that are set up in the preset.
In other words, when you request the sound dump, the received SysEx will make the parameters on the E1 screen change all at once to the actual values the synth patch has. It’s like opening up your patches, and finally seeing how the original sound designer has set up his patch.

Moreover, and this is very important for live performances: the controls in the preset will be matching the actual value the synth has for that parameter. If you now tweak that control on the E1, no sudden changes in the sound will appear anymore! Try doing that on any other regular hardware synth :smiley:

However, keep in mind SysEx was often conceived for very different purposes, i.e. sound backup in a librarian, or exchanging sounds between two synths of the same model. And as a result the way the sound parameters were set up in sysEx are more often than desired different from the way thier counterpartner CC or NRPN controls are behaving.
I won’t be explaining all the variants that are out there in the ‘real world’, but let’s discover the intricacies of the SysEx parameters as conceived by the A-station design team, together !

For matters of this roadmap, we’ll be dividing the parameters in groups. Once a group of similar parameters has been explained, I’ll be setting them up in the A-station preset, and increase its version number accordingly.

RTFM
Let’s first look at the manual and discover if Novation bothered to desribe the payload of the Sound Dump (not everyone does that, you knwo). And yes, they have! Novation has called it the ‘Program Data Block’, and it’s detailed on pages A-13 through to A-15.

Examples of this Data block’s content:
image

image

Immediate observations:

  • One byte is just one parameter, or sometimes a combination of 2 or 3 parameters. But never is a parameter spread over more than one byte. That’s actually nice and neat to work with. There are examples of SysEx where one parameter’s bits are found in more than one byte (typically 2): Moog does it, Korg, Sequential.
  • You immediately can see different ‘types’. There seem to be:
    Packed parameters : one byte used for 2 or 3 parameters
    Regular parameters: just a name mentioned. I expect all theses ones go from 0…127, but we’ll have to see if that is consistent (it’s a manual, there might be errors or onconsistencies, remember)
    Signed value parameters: market with ***. It denotes a signed value where 64 represents zero. Unless noted, this is -64…0…+63 stored as 0…64…127. Another example is -12…0…+12 stored as 52…64…76
    Selection lists: parameters with selection lists that do not cover the full 0…127 range.

We will go through them type by type

3 Likes

Step 3A. The regulars - the first 2 mappings

Regular parameters are problaby all those parameters that just have their name mentioned. I expect all these go from 0…127, but we’ll have to see if that is consistent.

The order I’ll go through them is the order of the Program Data block: we’ll start at novation byte 0, end at 127, and parse all those parameters that seem to be ‘regular’.

First one (and since it’s the first one, the most exciting one :partying_face:) on the list is byte 1 UNISON DETUNE:

image

Remember we expect byte 1 of the manual to find it in our parsed SysEx as byte 1+4 = byte 5 (because we fooled the E1 into believing the last 4 bytes of the response header are part of the payload).
In preset V2c, you’ll find Unison Detune on page 2Osc Advanced” with the original name “UNISON DETUNE”. It has been assigned CC #68 with the normal format of 7 bits. Be sure you find back all of the above.

Now let’s check if we can make the E1’s device editor help us in our reverse engineering, and get the answer to the following questions:

  • is byte 5 indeed the byte changing the Unison Detune ?
  • If yes, what bits of the byte are relevant ?
  • And what do they mean?

For this to work, we first set the control on our E1 on a very specific value.This detune goes from 0…127, but I will set it manually on 59. Remember my preset already controls the synth, so by setting CC #68 to value 59 on the E1, I actually set it to value 59 as well in the edit buffer of the current sound in the Novation… So when we request the sound dump, we should get back a SysEx message reflecting our value somehow, somewhere.

As explained before, go into the Mappings page of the Device Editor and Enable MIDI Learn with the right most mic-symbol. The editor will tell you it is waiting for MIDI messages…

Now press the upper right E1 button, and see what happens on the Device Editor:

  1. Upper right, in blue; the editor indicates it has received a message
  2. In the middle part you now see the SysEx response message appear, divided in bytes. Each byte has 8 bits to them, but the most significant one (the one on the left) is blanked out, as you cannot control this. The MIDI protocol only allows you to use the 7 least significant bits of a byte for payload purposes.

Let’s take a closer look on such a byte info line:
image

From left ot right , you’ll see the following:

  • a byte ID
  • the value of the full byte in hex (two digits, followed by ‘h’)
  • the value of the full byte numerically (0…255, but in payloads limited to 0…127)
  • the value of the full byte in ASCII, as interpreted by the E1
  • the greyed out bit number 7
  • in descending order: bits 6…0 (always an encircled 0 or 1)

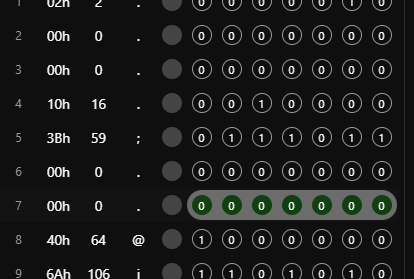
Let’s look at our byte 5: it has returned us a string of 0111011, which corresponds to our value 59!! We seem to have a match, but we must be sure.

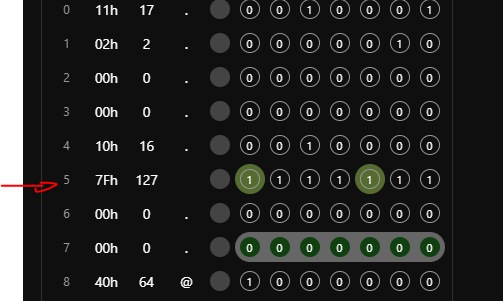
I will now set the value of Unison Detune to the maximum (=127) on the E1, and request the Sysex again. This is the response:
image
I now set the value of Unison Detune to the minimum (=0) on the E1, and request the Sysex again. This is the response:
image

Can you see how the SysEx byte 5 is nicely following the values I gave the Unison Detune on my E1. You can be pretty damn sure now (forgive me the language), I’m looking at the right 7 bits, that gives me the value corresponding my CC #68 in a 1-to-1 fashion. Yoohoo :smiley:

Time to map the two byte and the E1 parameter together.
In the upper left selection field, let’s enter the first characters on the control name. After having entered ‘unis’, the editor already filters the potential control candidates to only 2.


By checking the name and the CC-number, it’s easy to establish it’s the first of those two we are after.
Click on that control: a rectangle will appear saying ‘RULE MAPPING no mappings found’:

For reasons of clarity, I’ve now set my Control on the E1 to value 95, and requested the sound dump again.

Now click on the leftmost bit of the 7 bits we want to assign and observe:

  1. the chosen bit wil be encircled in blue, to indicated it is mapped with a parameter
  2. the rectangle now says it has a RULE MAPPING: we’ve mapped bit 6 (“6…6”) of the byte on position 5 to bit 0 of our desired CC #68, which gives us… a parsed value of 1, where we want to get 95. Oh no, that is not okay yet!!!

But you guessed already; we have to map all 7 bits of that byte 5 to obtain the full range 0…127.

Do this by holding Shift, and then click subsequently through all remaining 6 bits, until the RULE MAPPING shows you:

Now you see all 7 bits are considered as one mapped block, and the mapping states you have parsed a value of 95 :slight_smile: using bits 0…6 of the byte on position 5.

Congratulations, you’ve done your first mapping.

Let’s see how it looks like in the json tab:
image

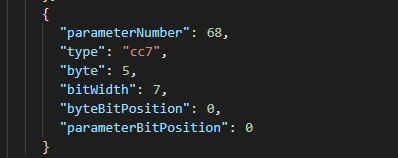
You read this as follows:
Take byte 5 of the response, start at the bit at position 0 (the rightmost) of the byte, and take a width of 7 bits to the left, and put these 7 bits in the value of CC (the 7bits version) #68, starting the bit on position 0 of that parameter.
So value 0…127 of byte 5 will be mapped onto values 0…127 of Cc #68. Exactly what we want.

I now repeated the same exercise for Glide time CC #5, which is called Portamento time by Novation.

See for yourself if you can find these two mappings back in the preset.Electra One App

5 Likes

Step 3B. Doing multiple mappings in a row.

Now let’s speed up things a little bit. In the A-station manual there are a lot of regular parameters that need to be mapped. We are more or less assured all these are straightforward to map like the first 2 we did. So we’ll change the following 12 in a row.

Here’s how you do this: select the parameters you want to tweak, set the first one to exactly 10, the second one to 20, then 30, 40… until 120 on the E1. Go into the PC in the Device Editor, on the Mappings tab and enable Midi Learn. Then request the sound dump on the E1.

Now let’s have a look at the result as off byte 37+4 = 41, and yes! We are getting back the expected results.

Now we can map those 12 one after the other the way we did with the previous regular parameters. If you forget how you called a certain control, you can always check them on the E1 itself!

Once you’ve done all twelve, there result in the Editor should look as follows:

  • All twelve 7 bit rows should be surrounded by a greyish or blueish background.
  • The one with the blue background is the selected one and should show its rule mapping in the left parameters column

I have a habit to set some (popular) parameters on multiple pages. An example is shown here: Cutoff. Notice it’s the same parameter as they are of the same type (CC7) ànd the same number (#105). But the first one is on page ‘Filter, Env, LFO’ and the last one is on the ‘Performance’ page.

For mapping you only have to map the SysEx bits to only one of these controls, the rest will take the same mapping automatically. Important to understand: a Sysex message part is actually not mapped to a control but to a parameter! One of the consequences is: if ever you want to make a mapping to something you do not want to assign to a control, you can do this in two ways:

    1. create a control anyways and then make it invisible
    1. add the mapping manually into the json

What if you have 2 controls with the same name on the same page?
image

There are four ways to figure out which one you are aiming for:

  • you temporarily change one of the name to make them unique
  • you browse through the manual the find the matching CC or NRPN the controls were assigned to
  • if their slots have a different color, you can see the colour as well in the device editor.
  • have Midi-Ox running and tweak the controls. Midi-Ox will show you instantly what CC or NRPN is assigned.

The last method is the fastest.

How fast can one map?

That depends a bit on how simple or difficult the particular case is, and how focused you can work. I do it at ease, but just mapped 26 parameters in 33 minutes.

The preset will now be changed into version V2d, since now all regular parameters are indeed mapped.

2 Likes

Step 3c Mapping the signed value parameters.

Let’s start with 2 parameters that are easy to check:

  • Pan” has a range from -64…0…63 (byte 117 in the SysEx, CC #10 ranging 0…127)
  • Semitone” of oscillator one has a range from -12…0…+12 (byte 7 in the SysEx, CC #40, ranging 52…76)

So both of them seem to center around CC value 64, which equals the center. Or better said, if we subtract 64 from the real value we get to the display value on the E1. But this offset of 64 is the same one we do on all signed value parameters of the A-station when we compare the value to send of each control with the value to display.

That probably means we can assign here as well all 7 bits to shape the 0…127 range to each of these parameters: any received value from SysEx will perhaps be in a smaller ranger (like with Semitone), but that is not a problem. The other way round, since we limited the value to send for eahc control as well in the E1, we can’t really get or receive values that are out of bounds, even if we theoretically would accept all 7 bits.
If this theory would be correct, the two selected parameters should yield the following mapping:

Pan at minimum : value = 0, display = -64
Pan at center : value = 64, display = 0
Pan at maximum : value = 127; display = 63
Semitone at minimum : value = 52, display = -12
Semitone at center : value = 64, display = 0
Semitone at maximum : value = 76; display = 12

Let’s check by setting those 3 values and requesting the sysEx sound dump: indeed the values in the sysEx are the same as the ones in CC, so Novation has made it easy for us. We can map the same way as with regular parameters.

Example of the returned value when byte 7 (for E1 : 7+4 = 11) is set to +12. We get the same value in sysEx as in CC, namely 76.

image

When now I map multiple parameters at once, I do this by giving them a different offset to the center value of 64. For instance for OSC1 I’ve set all signed value parameters with a value starting at -10 for “Semitone” until -4 for “Modenv > PW”. that works will except for the control “PW / Double” where I gave the E1 slot a display range from 0% to 100% whereas the underying values are 0…127. So it’s a bit more tricky to give it an exact value.

In the picture below you see that all values set indeed range between 54 (= 64 -10) and 60 (= 64 -4), except for E1 byte 16 (= byte 12 in the A-station Program Data Block); I hoped I had set value 58 ( = 64 - 6) but apparently I set 56. That’s is not an issue as long as one understands what one is doing.

Finding a parameter using reverse engineering.
Another quick way to map parameters, is by using “Reverse engineering”. That means doing the following sequence:

  • request a sound dump
  • tweak a control
  • request the sound dump again
  • check where the bits have changed. The changed bits indicate the change between the previous and the new dump, so then you know the impact of tweaking that particular control.

In order to do this properly the first time, start by unmarking any marked bits with the eraser:

Now tweak the control you want to map, and request the dump again:

in this case I’ve been tweaking byte 24.

Finding the right control using categories.

Here’s a page of controls that look very nice, but for mapping it is difficult to recognize them as most of the names appear three times in the page but with different CC numbers. I hate going back and fro in manuals comparing CC numbers versus SysEx numbers to find out what is what. It’s just no fun.

What can help here is the use of the lesser known categories.
For this case , I created 3 categories, for each part of the page: modwheel, aftertouch and breath:

image

Then I assigned all controls of that “expression” page to one of these catagories:

A bit of work, but you’ll see it is helpful for a tidy preset:
Now when performing mapping, I can filter on such a category, so I get only the see the predefined slots belonging to it:

After I’ve tweaked ‘Ptich Depth’ ( in other words the one belonging tot the modwheel categoryn not one of the other two) and use the reverse engineering trick, I can now easily find relationships between sysEx and NRPN or CC controls, without constantly referring to the manual

Once you get the hang of this, you 'll find in many cases this to be a very fast way of mapping, where you can do up to 4 parameter mappings per minute.

Clearing the green markers

If after a while all bits are getting colored green, making it hard to find the new ones, then use the clear function on the right side. Go ahead give all three of them a try until you figure out their use during mapping:
image

We’ve now parsed about 75% of all parameters already. Therefor I’ll set the version of the preset to V2e now.

3 Likes

Step 3D. Mapping selection list parameters

Remember at the beginning of step 3, I mentioned there are about 4 different types of parameters to map:

Packed parameters : one byte used for 2 or 3 parameters
Regular parameters: just a name mentioned. I expect all theses ones go from 0…127, but we’ll have to see if that is consistent (it’s a manual, there might be errors or onconsistencies, remember)
Signed value parameters: market with ***. It denotes a signed value where 64 represents zero. Unless noted, this is -64…0…+63 stored as 0…64…127. Another example is -12…0…+12 stored as 52…64…76
Selection lists: parameters with selection lists that do not cover the full 0…127 range.

We have done most of the mapping work already and will now continue with the selection lists.
In reality I will now cover all remaining patch parameters that aren’t grouped in Packed Parameters.

Value ranges: compact or spread?

First of all, you need to realize that in the MIDI world when someone makes a selection list with x options (whereby x is higher than or equal to 2 and x is lower than or equal to 127), there are two basic flavours:

  • compact range: the options get a value starting at 0 and ending at x-1
    – Example: a parameter with 5 options then gets values 0, 1, 2, 3 and 4
  • spread range: the options get evenly spread (more or less) accross the entire range of 0 …127
    – Example: a parameter with 5 options then gets values 0, 32, 64, 96, 127 but other manufacturers it might choose to use 0, 31, 63, 95, 127

Now here’s the catch: the spread range 0…127 is the preferred way of setting CC parameters, as the full turn of a knob can be used to access all options, regardless how many there are. But the compact range is the preferred method for setting a parameter in a sysEx message because you can transmit with less bits that way (values rangeing from 0…127 require 7 bits to transmits, wheres a value range 0…4 can be done in 3 bits).

These kind of details are seldomly mentioned at full length in the manufacturer’s manuals, but you must be aware of them.

Let’s see how our A-station is doing with its the CC or NRPN parameters:
we’ll check:
CC #3 “ARP PATTERN” : 6 options ranging 0…5
CC #13 “SYNC PAN RATE” 35 options ranging 0…34
CC #20 “SYNC DELAY TIME” 20 options ranging 0…19

So it looks it is our lucky day : Novation has chosen the non conventional compact range method for arranging its CC parameters values, but that is good for us, because chances will be high of a perfect match between CC and SysEx values.

For this to be sure we’ll perform again the illustrious E1 reverse engineering trick with the MIDI learn on the mappings page and check what range of values we get when tweaking those 3 parameters on the E1 or the A-station.
I’ll first set all three parameters on a high level, then perform a first sound dump request with the upper right button on the E1, and in the editor clear any marked bits if any.
Now I turn all three parameters to their minimum on the E1, and request the sound dump once again. The changed bits will show up nicely as green encircled ones:


You see they all have the 0 value? Byte 107 on the editor corresponds to 107-4= 103 of the Program Data Block, of which the manual says this is “SYNC DELAY TIME” so we are clearly on the right track.

Let’s set all three parameters to their max now and request once again the sound dump


*Notice the max range of the requested values in the SysEx nicely matches the ones of the CC? We are not always that lucky :smiley: *

Why not map all 7 bits for selection lists
In theory you could now map all 7 bits again between the SysEx and the controls of selection lists, since in this case there seems to be a perfect one-on-one match between CC and SysEx byte, but I advise you not to do that. Just map the necessary bits to cover the full selection range, but no more.
The reason: sometimes the manufacturer may have used the remaining seemingly unused bits for other, non-documented reasons, so these might change as well. However if you would have mapped them it would have brought the received value outside the range you’ve assigned to that control in the E1. It is better to avoid such situations.

I can also start mapping from the right side, then click the bit to the left , until I’ve reached the highest bit with value = 1:

Do so for all selection list parameters !

Once you’re finished, you’ll now have some mapping of varying lengths visible in the table:

If I counted well there are about 18 bytes left in the preset that haven’t been mapped yet. But that is for next time.
As usual, I’ll move the preset version to V2f now.

5 Likes

Step 3E: the Packed parameter mapping. Constructing values and deconstructing bit groups

We’ve saved the most complex for last. When a manufacturer uses a single byte or a single CC to control two or more parameters (and you’d like to have a control in the E1 for each of those parameters) we can speak of a packed parameter.

Looking at the manual, Novation made a simple, logical choice that actually is not the preferred one for us musicians: they actually used the packed parameter method both in the CC ànd in the sysEx, but luckily kept them the same.

Let’s take a look at the A-station’s packed parameter no 3:

image

Notice that 4 parameters here are controlled with 7 bits.
These are grouped together in SysEx in byte 5, and grouped together in #CC 70.
That means in both communications all 7 bits available to us in a MIDI byte are being used.

For most MIDI controllers, this kind of CC combinations are a hard nut to crack: you could theoretically use one CC control to send the whole range 0…127 but that would hardly be a musical way of interacting, nor intuitive to use. And splitting it in separate values to address them with separate controls is on its own not a solution. Every time you’d have them send out their values without taking into account the other 3 parameters, that would mean you reset those other parameters unwantingly to a default value. We need 4 controls, but whenever one of them is changed, we need to recombine them in order to construct the value of the CC to transmit and only then send it.

And here’s where the E1 shines, because with a little bit of coding you can resolve this. :partying_face:

Constructing a CC value

In the preset those 4 controls exists, and each of them have been assigned a self made function called “packedParam3”. Each control is a virtual control and has been given a parameter number which is the sum of 10 * the packed parameter number + the first bit they occupy in the set of 7 bits. Henceforth the 4 controls I gave numbers 30, 32, 34 and 36. Check for yourself.

The function :

function packedParam3() -- CC70 = OSC 1/2/3 WAVEFORM / PORTAMENTO MODE
  local result = 0
  local j = 30
  for i = 0,6, 2 do
    result = result + parameterMap.get (deviceId, PT_VIRTUAL, i+j) * 2^i
    -- bits 0-1 2-bit osc1 waveform sine, tri, saw, square (pulse)
    -- bits 2-3 2-bit osc2 waveform sine, tri, saw, square (pulse)
    -- bits 4-5 2-bit osc3 waveform sine, tri, saw, square (pulse)
    -- bit 6    portamento mode 0=exponential 1=linear
  end
  --print ("packedParam3= "..result)
  midi.sendControlChange (devPort, channel , 70, result)
end

In short:
Whenever the function is called, it is going to request the values via a loop going through all virtual parameters 30, 32, 34 and 36. It grabs the value of each of them , multiplies them by the weight of the first bit they represent (value of 30 is multiplied by, 1, value of 32 by 4, value of 34 by 16 and value of 36 by 64) and adds them together into one result.

Finally CC#70 is sent with that result. In the preset you’ll see that all packed parameters are slightly different but the lua code should start making some sense now.

Deconstruction a sysEx byte into various controls.

All we need to do now is parse the received SysEx byte in those various controls.
This is almost the same as what we’ve done before, but this time we will map only some bits of a byte into a single control. The rest of the techniques explained remain the same.

Let’s map the waveform of osc2 as an example. If we use the reversing engineering trick and go through all possible waveforms on the E1, the device editor will show us:
image

Now we only map those two highlighted green bits to OSC2 WAVEFORM:

So then we continue mapping the three other controls for the same packed parameter byte:

Now we can go through the whole preset and map all packed parameters, but that will be for tomorrow :wink:

1 Like