Making additional modulation and expression with lua

Hi,
I’m experimenting a lot with using the Electra One for adding modulation or expressiveness the original synths did not have, or were not able to offer to its user.
Be aware, these additions require lua to run, so if you are interested it might be a good moment to dive this pretty straightforward language.I’ll be taking this journey step by step, and will try to provide you background into what works and where I got stuck. Hopefully useful to someone somewhere :slight_smile:

Today let’s start with a teaser. These are the four modulations I’m currently building for my Minitaur. Beautiful sound it has but a bit limited in the expressive and modulation area. This particular addition is built in beta Firmware 3 but in FW2 you can already do some of this.
With the additional color possibilities of FW3, I use dark grey as a color for a control that is not meant to be tweaked, but is just a feedback signal for us users.

Catch you l8r

5 Likes

Dang it man! Now I need multiple E1 to run all this! Great job, as always.

Will check it out when I have time, want to know how you ran the lfo via Lua. I do the same vía midihub right now.

just today I was thinking on building a vintage knob (like in the prophet 5 re-release). Just set the amount of oscillators and amount % of drift, so each gets some different pitch/filter amount. however this will not work on all synths since the detune is usually global, but may do some fun on a mono synth!

1 Like

Additional ModWheel and Aftertouch Modulation.

On some synths, the amount of aftertouch or modwheel modulation may be fairly limited. For instance the Korg NTS (Electra One App) or the Moog Minitaur.

Here’s a simple way to resolve this.

For each of the additional modulation add two controls. One to control depth (called Multiplier in my preset), one to define the destination for the modulation source.
image

The multiplier was set up as a virtual list controller with depths (129 for Modwheel, 131 for Aftertouch). The destination is set up as a virtual list controller with CC’s to control 128 for Modwheel, 130 for Aftertouch).


The code you will need to make it work.


-- Controller for the Korg NTS-1 with added aftertouch and modulation wheel control

-- get the default info on the synth of the preset
deviceId = 1 
device = devices.get(deviceId)
devPort = device:getPort()
channel = device:getChannel()

-- retrieving default control values and assigning them to relevant parameters at start-up of preset
setupControl=controls.get(25) -- control is on the 25th location of the preset
setupValue = setupControl:getValue("")
parameterMap.set (deviceId , PT_VIRTUAL, 129, setupValue:getDefault()) --  set default mod wheel multiplier value
setupControl=controls.get(26) -- control is on the 26th location of the preset
setupValue = setupControl:getValue("")
parameterMap.set (deviceId , PT_VIRTUAL, 131, setupValue:getDefault()) --  set default aftertouch  multiplier value

-- apply modwheel to destination
function midi.onControlChange (midiInput, channelIn, controllerNumber, value) 
  if channelIn~=channel then return end -- disregard all MIDI channels except to one of the preset
  if controllerNumber~=1 then return end -- disregard all MIDI CC  except the one of the modwheel
  local modWheelMultiplier =parameterMap.get (deviceId , PT_VIRTUAL, 129)
  local destination=parameterMap.get (deviceId , PT_VIRTUAL, 128)
  local destinationValue=parameterMap.get (deviceId , PT_CC7, destination) -- retrieve the value of the destination CC, prior to modulation
  value = math.max(0,math.min(127,destinationValue+math.floor(value*modWheelMultiplier/100))) -- ensure value will remain between 0 and 127
  --print ("Destination CC= " .. destination)
  --print ("Destination value= " .. value)
  midi.sendControlChange (devPort , channel, destination, value)
end

-- apply aftertouch to destination
function midi.onAfterTouchChannel (midiInput, channelIn, value) 
  if channelIn~=channel then return end -- disregard all channels except the one of the preset
  local atMultiplier =parameterMap.get (deviceId , PT_VIRTUAL, 131)
  local destination=parameterMap.get (deviceId , PT_VIRTUAL, 130)
  local destinationValue=parameterMap.get (deviceId , PT_CC7, destination)
  value = math.max(0,math.min(127,destinationValue+math.floor(value*atMultiplier /100))) -- ensure value will remain between 0 and 127
  --print ("Destination CC= " .. destination)
  --print ("Destination value= " .. value)
  midi.sendControlChange (devPort , channel, destination, value)
end

Assumptions and limitations.

  • In this code, all destinations are assumed to accept values between 0-127.
  • The modwheel and aftertouch won’t work well if both control the same destination, as this simple lua code does not yet have the modwheel and aftertouch keep into account the potential modulation performed by the other mod source.
2 Likes

Wow that is awesome!

Would love to see the code for the LFO.
Although there are some limits for older sysex based synth its still awesome.
I was thinking it would be great if note on events could reset the lfo.
Or you have an envelope triggered.

Thanks a lot for sharing,

Cheers

Tim

1 Like

Here’s a sound sample using Aftertouch on the Minitaur, using the multiplier controls I send 25% into VCO2 Beat and 35% into VCF cutoff. So when I press the keys the sound is a little more bright and widens up due to the beat detuning which can be very musical and not possible on a regular Minitaur without three hands. You’ll notice on the lower end of the sound the effect is more dramatic.

Part 2 Resonance compensation on ladder filters.

If you own ladder filter stuff, you will know that the resonance is not really a good tool to tweak during bass parts as it drops the bottom end of your sound.
But with Electra it doesn’t have to be that way. I will show you how to lift volume while you increase resonance to compensate for that bass drop, which make a Moog bass stand out even while changing resonance.
For this to work you need a bit of headroom on the preset volume (MIDI CC7) else there is no way for the Electra One to increase it anymore.

My controls look like this
image

  • The first one is the actual control; just a simple On/Off Pad. (Virtual control, parameter 140, with a function “compensationOn”)
  • The second one is a fader control for feedback purposes only (Virtual control, parameter 141, with a function “showNothing”). On the Electra One no values will appear, just the bar.
  • The third is added here because it is handy. It is a standard MIDI CC 7 control, which is used on a Minitaur as the volume control for its presets (or patches). It is added here to be able to quickly change the standard volume, if not enough headroom is left for the resonance compensation to kick in.

And here is the code you need:

-- catch the main device parameters for use in MIDI instructions
deviceId = 1
device= devices.get(deviceId)
devPort = device:getPort ()
channel = device:getChannel ()

function showNothing () -- a simple way of not showing any values on a fader
    return ("")
end

function compensationOn(valueObject,value) -- only called when (des)activating
  if value== 1 then return end
  local CC7Value=parameterMap.get (deviceId , PT_CC7, 7) - get the preset volume as stored in the Electra One
  midi.sendControlChange (devPort , channel, 7, CC7Value) -- ensure the synth is in sync with it at start of the effect
  prevValueVol  =CC7Value -- ensure you store the actual preset volume at the moment of activation in prevValueVol
end

function resoCompensation(valueObject,value)
  if parameterMap.get (deviceId , PT_VIRTUAL, 140)== 0 then return end -- don't do anything if pad is off
  local CC7Value=parameterMap.get (deviceId , PT_CC7, 7)
  value = math.min(127,CC7Value+math.floor(value*70/100)) -- add 70% of the resonance value to the volume
  if value~=prevValueVol  then  
    midi.sendControlChange (devPort , channel, 7, value) -- offset the volume
    if CC7Value<=127 then parameterMap.set(deviceId, PT_VIRTUAL,141,math.floor(127*(value-CC7Value)/(127-CC7Value))) end -- change the feedback fader
    prevValueVol  =value
  end
end

function midi.onControlChange (midiInput, channelIn, controllerNumber, value)
  if channelIn~=channel then return end
  if controllerNumber==21 then -- only trigger the effect when on CC 21 (which is resonance on the Minitaur) and the right channel
     resoCompensation(valueObject,value)
     return
  end
end

Two things to consider:

  • When the fader gets to its maximum that implies you have used up all of the headroom that was available. If you need more headroom, lower the MIDI CC7 volume of the Minitaur patch a bit.
  • I find the 70% increase in volume in relation to 100% increase of resonance the good ratio. That is where the 70/100 factor comes from in the lua code.

Here are comparing sound examples

No resonance compensation:

With resonance compensation and initial preset volume on 51:

Have a good time.

LFO reset on note on : that works !
Gimme some more time to work on the LFO. It starts being very promising and musically useful, doing stuff (I’m testing on monophonic synths right now) most LFO’s are not capable of doing. Then I’ll explain starting from simple to advanced examples.

2 Likes

Wow great really.
Think an lfo that can:

reset per note or not
sync to clock

basicly the reset per note would make it a kind a attack envelope / tracking generator

Hello !
I have this message on my browsers … with @NewIgnis posts

Chrome & Vivaldi

1 Like

yep :slight_smile: there is no image attached to it. The forum does not allow me to upload mp3 or the likes, so I disguised it as a .mov file. you should be hearing the sample though, can you?

2 Likes

Yes ! Good trick ! :+1: :partying_face: :blush:

2 Likes

Tutorial: A simple LFO

Here’s an example of the first LFO I made, with which I wasn’t too happy, but this learning curve may be relevant.

I demonstrated this on Superbooth 2022 on a Korg NTS-1. A lot of visitors didn’t (want to) believe the modulated sound was made by that little device. That was a bit of motivation for me to keep searching for better modulation for simple synths in dire need :wink:

So here below I’ll explain the LFO I built back then for demo purposes. Actually in SB there were two Electra LFO’s running simultaneously, but I left the second one out to keep focus (imagine: combined with the NTS-1’s own tremolo and pitch lfo’s, and additonal aftertouch and modwheel capabilities I already explained, a lot was going on at the same time :heart_eyes:).

Anyways, this was my first attempt to make an LFO, using 5 controls. It will use the timer function of the Electra to provide modulation :

  • LFO On/Off : used to start and stop the timer

image

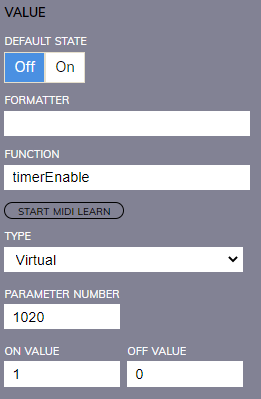
function timerEnable (valueObject, value)
  if value == 1 then -- start the timer
      timer.enable () 
      lfoTarget1=  parameterMap.get(deviceId, PT_VIRTUAL, 134) -- read the destination
      lfoDefault1 = parameterMap.get(deviceId, PT_CC7,lfoTarget1) -- read the value of the destination before modulating it
      print (lfoTarget1.." def= "..lfoDefault1 )
    else -- stop the timer
       timer.disable() 
       parameterMap.set(deviceId, PT_CC7, lfoTarget1,lfoDefault1) -- put back the original value after stopping the modulation
       parameterMap.send(deviceId, PT_CC7, lfoTarget1)
      lfoPrevTarget1 =128 -- make the lfo forget its previous target
  end
end

- Rate: set the lfo speed in steps

image

function lfoRate1(valueObject, value)
  lfoStep1 = value
end

- Type: choose between triangle, square, ramp up and ramp down

function lfoShape1(valueObject, value)
  lfoType1 = value
end

- Depth: set the depth of the modulation
image

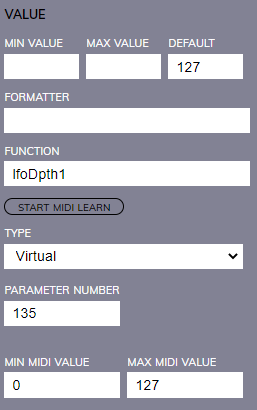
function lfoDpth1(valueObject, value)
  lfoDepth1 = value
end

- Destination : in this example all destinations are meant to be controlled as CC values 0-127

function lfoDest1(valueObject, value)
  if lfoPrevTarget1 ~= 128 then -- be sure to set and send any previous target back to its original value
    parameterMap.set(deviceId, PT_CC7, lfoTarget1,lfoDefault1)
    parameterMap.send(deviceId, PT_CC7, lfoTarget1)
 end
  lfoPrevTarget1 = lfoTarget1 -- set the 'new' previous target
  lfoTarget1=  parameterMap.get(deviceId, PT_VIRTUAL, 134)
  lfoDefault1 = parameterMap.get(deviceId, PT_CC7,lfoTarget1) -- memorize the original value of the new target
  print ("value= "..value.." lfoPrevTarget1 : "..lfoPrevTarget1 .."       lfoTarget1 : "..lfoTarget1.." with lfoDefault1 : "..lfoDefault1 )
end

Now, all of that won’t do much good. We also need to initialize some parameters and then tell the E1 what to do when the timer reaches a tick.

- The initialisation of the parameters

deviceId = 1 -- check your preset, as your deviceId might be chosen differently
device = devices.get(deviceId)
devPort = device:getPort()
channel = device:getChannel()
lfoVal1= 0 -- current value of the lfo (will move between 0 and 127)
lfoPos1 = 1 -- current position of the lfo in its cycle (cycle starts at 1 until 1270)
lfoStep1 = 0 
lfoType1 = 0
lfoPrevTarget1=128
lfoDepth1=127
lfoTarget1=26 -- setting a default could be resolved nicer, but I used a shortcut here
parameterMap.set (deviceId, PT_VIRTUAL, 134, lfoTarget1) 
lfoDefault1 = parameterMap.get(deviceId, PT_CC7,lfoTarget1)
timer.setPeriod (20) -- timer will tick each 20 milliseconds

Finally the heartbeat:
Every time 20 milliseconds elapse, the E1 will set and send a MIDI message and move to the next lfo value and lfo position, as long as the timer remains enabled.

function timer.onTick ()
    parameterMap.set (1, PT_CC7, lfoTarget1, math.min(math.max(lfoDefault1+lfoVal1,0),127)) -- changes the control that is being modulated within the 0-127 boundaries starting at its orginal default value
    parameterMap.send (1, PT_CC7, lfoTarget1) -- modulates the control
    lfoPos1= math.fmod (lfoPos1+ lfoStep1+1, 1270)+1 -- calculates the new position of the lfo between 0-1270
    if lfoType1==0 then -- sets lfo value according to a triangle
          if  lfoPos1 >=636 then lfoVal1=math.floor(lfoDepth1*((1270-lfoPos1)/635-1/2))
              else  lfoVal1=math.floor(lfoDepth1*((lfoPos1)/635-1/2))
          end
      elseif lfoType1==1 then -- sets lfo value according to a square
          if  lfoPos1 >=635 then lfoVal1 = lfoDepth1 else lfoVal1 = 0
          end
      elseif lfoType1==2 then 
             lfoVal1=math.floor(lfoDepth1*(lfoPos1-1)/1270) -- sets lfo value according to a ramp up
      else lfoVal1=math.floor(lfoDepth1*(1270-lfoPos1+1)/1270) -- ramp down
    end
end

Lessons learned with the simple LFO

  • allthough this LFO works, I could not get it stable for a longer period of time, but this could be due to other circumstances. Would love to hear some else’s experience with this LFO.
  • this LFO keeps the E1 and certainly the MIDI very busy as it sends out a MIDI message every 20 ms, regardless if the value had changed or not.
  • the range of the rate was not very satisfying. A linear rate is not very musical for an LFO. In the lower settings the jumps are too big, in the higher settings the changes are almost irrelevant.
  • I loved to see the controls move up and down, and it is good for demo purposes, but there is a drawback: this simple logic is not coping well if you start changing the modulated midi CC value itself while the lfo is running.

Anyways, it would be good to get some feedback. If you can make this one work, you 'll be able to understand better the more elaborate ones I’m currently making.

That’s it for this week :slight_smile:
Have a good weekend, keep on making music.

2 Likes

great series of posts/examples. You asked about timer stability.

From programming in assembly language and other languages over the years, one general rule always applied – inside an interrupt handler do as little as possible.

The timer.OnTick() is basically an interrupt handler so I would try to minimize the work done in there if possible. In my tc2290 preset, I was using it to send 2 sysex strings to create an auto-increment/decrement function that kept changing values as long as a key was pressed. Since there is only 2 calls in there, it is very responsive.

For LFOs and knowing you have to send a MIDI value of 0-127 (in most cases, the 14 bit stuff is a different discussion), I might create a table of 128 values, do the math and populate the table with the values for a shape ahead of time. Store a global for the current index into the table and do a

index = (index + 1) MOD 128 (knowing that when you use it in the array it’ll be 1 + index since LUA by default starts counting at 1 for indexing not 0, but this keeps the math simpler inside the interrupt)

calculation in the timer.onTick() function after sending the current value. So inside the tick function you are only sending a message and incrementing a counter.

You can do key restarts by resetting the index to 1 and even do things like phase shift 45, 90, etc by changing the index start value.

3 Likes

some good news here: the LFO proofs to be much more stable on the FW3.

3 Likes

Note reset with variable start phase

(requested by @Flyweight )

Particular useful on mono synths is that you can reset the lfo each time a new note is pressed. This is fairly easy to do. Remember the two main parameters of an LFO are its position and output value:

  • lfoPos1: the place in the cycle the LFO is at a given time. In my simple LFO this variable starts at 1, goes to 1270 and then starts a new cycle at 1.
  • lfoVal1: this is the output value of the LFO, based on the desired LFO waveform. In my example lfoVal1 has a range from 0 to 127, suitable for regular 7 bit MIDI CC controls.

If we build a reset to our simple LFO , this is wat we must do:

  • when reset is enabled and a note On is received, move the lfo Position back to the start of the cycle. In the code below I added a control 181 that enables (value = 1) or disables (value = 0) the reset:
function midi.onNoteOn (midiInput, channelIn, noteNumber, volume)
  if channelIn~=channel then return end -- only listen to the channel the device is tuned to
  if parameterMap.get (deviceId , PT_VIRTUAL, 181) = 1 then -- lfo reset
     lfoPos1= 0
  end 
 end

You might notice how simple it now becomes not only to foresee LFO reset, but also decide the phase (position) the LFO should restart at. All you need to do is change controller 181 into a fader, for instance going from 0 to 127.

  • When on 0, the LFO reset must not take place.
  • All other values define the reset position, where value 1 triggers start position 1, 2 triggers start position 11, 3 => 21, 4 => 31 … 126 => 1251, 127 => 1261.
function midi.onNoteOn (midiInput, channelIn, noteNumber, volume)
  if channelIn~=channel then return end -- only listen the channel the device is tuned to
  if parameterMap.get (deviceId , PT_VIRTUAL, 181) > 0 then -- lfo reset
     lfoPos1= parameterMap.get (deviceId , PT_VIRTUAL, 181) *10 - 9
  end 
 end
3 Likes

Thanks for sharing your findings NewIgnis - a truly valuable insight.

I was thinking about what an end-game lfo feature could look like, and I could easily imagine how the ui part of the implementation could look like, e.g. drawing a custom shape the same way you would do in a vector editor, using linear and/or curved segments…

The idea of translating the shape drawn into a function that would output a value per position however just hurts my brain - I haven’t done math of this level since for more than 20 years :smiley:

1 Like

I’m not into drawing waveforms myself, but I like simple mathematics. So i’ ll be giving some info how you can continuously change waveforms by skewing them.

1 Like